

Quick Answer:
What Is a Solar Panel Maintenance Checklist?
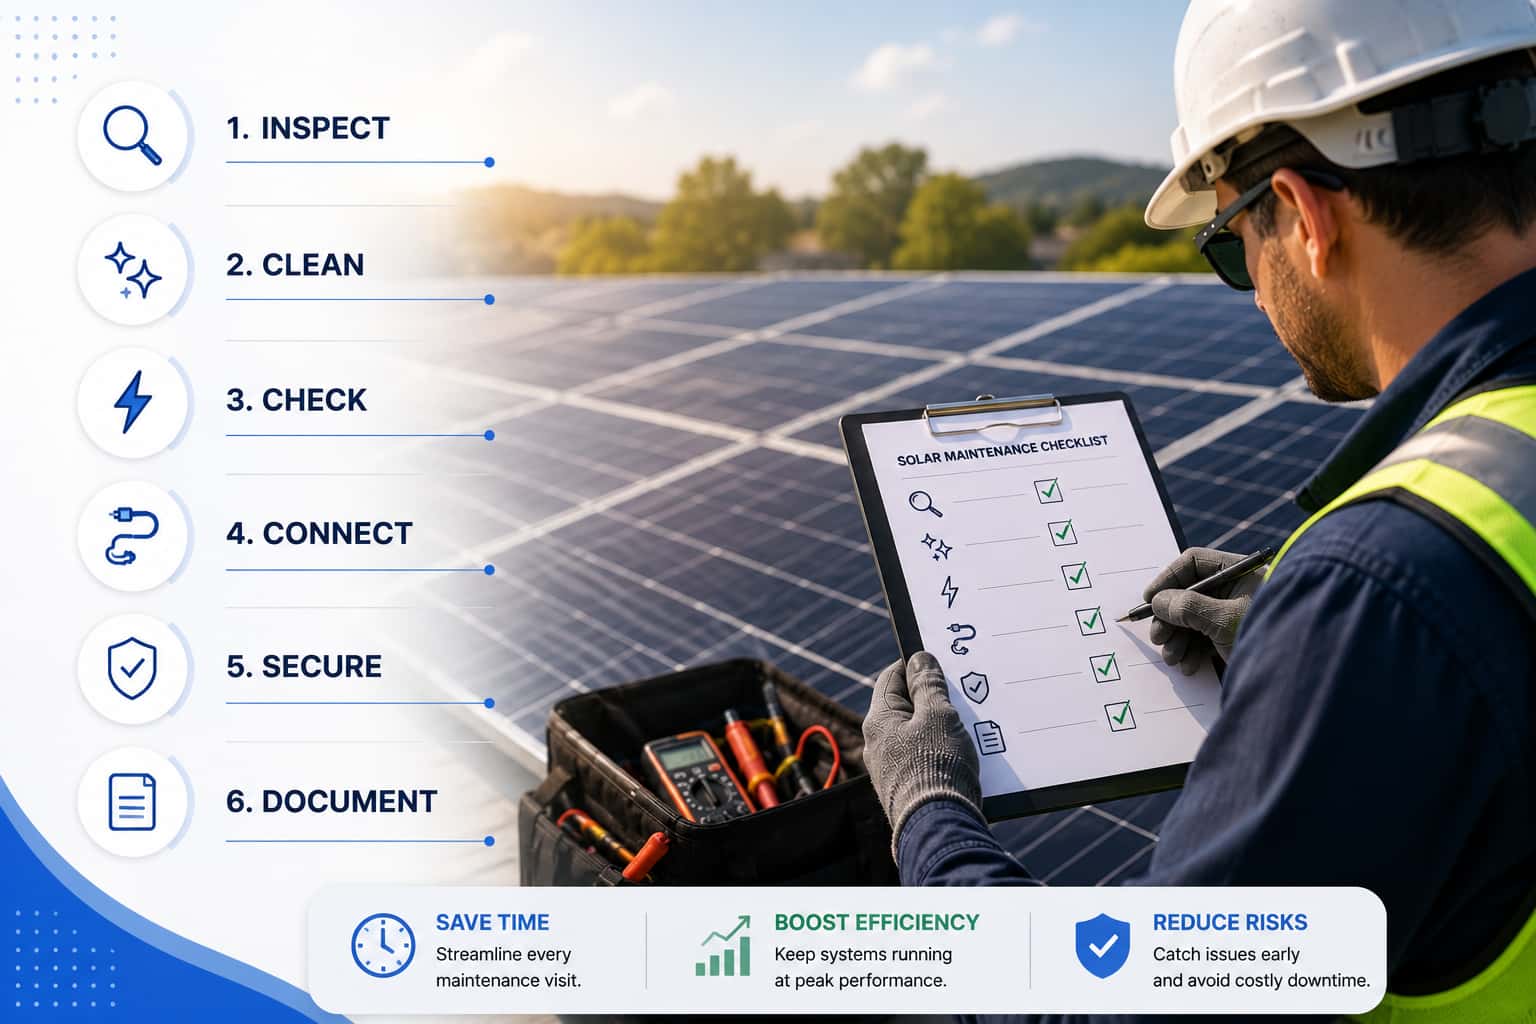
A solar panel maintenance checklist is a standardized inspection form used to check the condition, safety, cleanliness, and performance of a solar PV system.
A good solar maintenance checklist usually includes:
- Site information
- Panel condition & mounting system checks
- Electrical component inspections
- Inverter performance
- Safety checks & cleaning needs
- Photos and technician notes
- Repair recommendations
- Customer sign-off
Solar maintenance: is operationally complex. Even when the technical work is straightforward, the coordination and documentation can become messy.
Multiple sites vary: A checklist keeps inspections consistent across rooftops, commercial sites, ground mounts, and carports.
Different technicians document differently: A standard checklist keeps reports consistent across senior techs and new hires.
Scattered records slow follow-up: If photos, notes, and readings live in different places, coordinators lose time finding information and scheduling repairs.
Missed tasks cause repeat visits: One skipped inverter log or missing photo can mean another truck roll.
Warranty and compliance need proof: Clear records support claims, reports, audits, and service agreements.
See Why Paper Checklists Fail and How Digital Forms Fix It
Thus, a more standardized approach to planning and delivering O&M can help reduce costs and make those costs more predictable over time. To help you do that, we show you in this guide how to build a solar panel maintenance checklist that helps technicians inspect faster, document clearly, and hand the office enough information to schedule repairs without digging through notes or spreadsheets.
What to Include in a Solar Panel Maintenance Checklist?
Use this as a core checklist. Add site-specific items for commercial rooftops, ground mounts, carports, battery systems, or utility-scale assets.
Site Information
✅ Capture the details that make the record searchable later.
✅ Confirm site address.
✅ Confirm customer or asset owner.
✅ Record system ID or asset ID.
✅ Record technician name.
✅ Record date and time.
✅ Record weather conditions.
Weather matters because production readings without weather context can mislead the office.
Solar Panel Inspection
Write these as field commands, not vague reminders:
✅ Inspect module glass for cracks or chips.
✅ Inspect frames for bending or separation.
✅ Check for discoloration.
✅ Check for delamination between module layers that can allow moisture in and reduce module life.
✅ Look for hot spots that can signal cell damage, mismatch, or electrical stress.
✅ Check dirt, pollen, bird droppings, and debris.
✅ Identify new shading from trees, vents, equipment, nearby buildings, or roof obstructions.
Require photos for module damage, hot spots, heavy soiling, or new shading.
Mounting System Inspection
✅ Verify clamps are present and secure.
✅ Verify racking bolts against the required torque standard.
✅ Inspect rails for movement or damage.
✅ Check corrosion on exposed hardware.
✅ Inspect roof penetrations for failed sealant or flashing issues.
✅ Document structural damage or roof concerns.
Do not leave roof issues as free-text notes. Use pass/fail fields and photos.
Electrical Inspection
✅ Inspect visible wiring for cuts, abrasion, or exposed conductors.
✅ Verify connectors are secure and matched correctly.
✅ Inspect conduit for damage or loose fittings.
✅ Check junction boxes for water intrusion.
✅ Verify grounding and bonding condition.
✅ Inspect disconnect switches for labeling, access, and visible damage.
✅ Inspect combiner boxes for heat marks, loose covers, water, or corrosion.
Electrical checks need clean documentation because they affect safety, warranty, and repair urgency.
Inverter Inspection
✅ Record inverter make, model, and serial number if not already stored.
✅ Record current operating status.
✅ Record error codes exactly as displayed.
✅ Check ventilation clearance.
✅ Check inverter temperature or overheating signs.
✅ Confirm monitoring communication status.
An inverter note that says “checked” is useless. The record needs status, code, and proof.
Performance Inspection
✅ Record current production.
✅ Record voltage readings.
✅ Record current readings.
✅ Review monitoring alerts.
Compare output against expected performance where data is available. If your team uses a performance ratio, define the acceptable range in the checklist. Do not make technicians guess what “low” means.
Safety Inspection
✅ Confirm required PPE before starting work.
✅ Confirm warning labels are present and readable.
✅ Check emergency shutoff access.
✅ Identify fire hazards around equipment.
✅ Flag arc-flash risks before electrical work.
Arc flash is not just a compliance phrase. It is a high-energy electrical hazard. Treat it as a stop-and-escalate condition.
Cleaning and Preventive Maintenance
✅ Confirm whether cleaning is required.
✅ Remove loose debris where included in scope.
✅ Document vegetation that could create shading.
✅ Check drainage issues around ground-mounted systems or flat roofs.
Cleaning frequency depends on site conditions. Agricultural dust, coastal salt, bird activity, and industrial pollution may require more frequent cleaning than a low-dust residential site.
Documentation and Follow-Up
Attach required photos before closing the visit.
Add technician notes only where structured fields do not cover the issue.
Assign repair priority: critical, high, medium, or low.
List parts required.
Create follow-up action.
Capture customer or technician signature.
Best Practices to Build a Solar Maintenance Checklist
1. Start with the outcome of each inspection
Before adding checklist fields, decide what should happen after a technician marks an issue. A failed inverter check should create a repair task. Or, a dirty array may trigger a cleaning recommendation. Your checklist should help the team decide the next action.
2. Build the checklist around real job types
Do not use one generic form for every visit. A preventive maintenance visit, repair inspection, cleaning job, inverter issue, and warranty check may need different fields. Create checklist sections based on the services your team actually performs. This makes the checklist easier for technicians to complete and easier for the office to review.
3. Use structured fields instead of open-ended notes
Free-text notes are useful, but they should not carry the whole inspection.
Instead of asking technicians to “describe the issue,” use fields like:
Status: Pass / Fail / Needs Repair / N/A
Priority: Critical / High / Medium / Low
Photo required: Yes / No
Follow-up needed: Repair / Cleaning / Supervisor Review / Customer Approval / None
4. Make photo capture part of the checklist
Do not rely on technicians to remember when to take photos. Build photo requirements directly into the form. This gives the office proof without chasing the technician after the visit.
5. Add repair priority levels
Every failed item should have a priority. Otherwise, a dirty panel, offline inverter, loose connector, and missing label can all land in the same queue.
Use simple priority levels:
Critical: Safety risk or system offline
High: Production loss or urgent repair
Medium: Repair needed, but not urgent
Low: Monitor or schedule later
Priority levels help dispatchers decide what to schedule first.
6. Connect failed checklist items to follow-up work
For each failed item, define whether the team should create a work order, order parts, schedule cleaning, or send a report. This is where digital maintenance workflows become useful. The digital inspection record can move directly into scheduling, dispatch, and follow-up instead of sitting in a completed form.
7. Include customer-facing documentation
Add fields for customer notes, before-and-after photos, technician recommendations, customer signature, and report summary. This makes it easier to send the customer a clear maintenance report after the visit.
8. Keep site history connected to the checklist
Add a way for techs to review previous inspections, recurring issues, past photos, customer notes, and repair history before starting the visit. This helps them avoid duplicate checks and gives them context for recurring performance problems.
9. Review and improve the checklist after real visits
After 30 days, review completed checklists. Look for missing photos, unclear notes, repeat visits, skipped fields, and questions technicians rarely use. Remove fields that slow people down. Add fields that prevent rework.
Want to connect solar inspections with scheduling, work orders, customer updates, and maintenance history?
Read our guide to field service management software for solar teams.
How Digital Solar Maintenance Workflows Improve Efficiency
Even if your techs complete the inspection properly, the paper checklist still leaves work for the office because now someone has to read the form, find the photos, confirm missing details, prepare the customer report, and create any follow-up repair tasks.
A digital workflow removes that extra handoff. The technician completes the checklist on mobile, captures the required photos and readings, and submits a record the office can use immediately.
A connected maintenance workflow should let your team:
Schedule the maintenance visit.
Assign the technician or crew.
Send site history, job instructions, and the checklist to mobile.
Complete the checklist in the field, even offline.
Capture required photos, readings, notes, and signatures.
Generate the service report.
Create follow-up work orders from failed items.
Store the completed record in the site history.
This is where Arrivy can help solar O&M teams digitize maintenance checklists without creating another disconnected process.
Arrivy’s digital forms allow teams to capture structured fields, photos, notes, signatures, and calculations, including offline form completion when field connectivity is limited. That helps solve the missing-photo and incomplete-report problem because required information can be built into the checklist before the technician closes the job.
Arrivy also keeps job instructions, customer details, site photos, notes, checklists, and service history connected to the work order. Technicians can see the context before they arrive instead of relying on scattered records or office calls.
For solar teams, that means fewer scattered records, fewer office follow-ups, cleaner customer reports, and a faster path from inspection to action.
Download the Solar Panel Maintenance Checklist Template
Solar Panel Maintenance Checklist for O&M Teams
Conclusion
A good solar panel maintenance checklist keeps the visit, the report, and the follow-up work connected. It helps technicians inspect the right items, capture the right proof, and give the office a clear path to the next action. That means fewer missing details, fewer repeat visits, cleaner customer reports, and better maintenance history across every site.
Ready to replace paper forms and scattered photos? Use Arrivy to digitize your solar maintenance checklist and manage inspections, work orders, customer updates, and follow-ups in one workflow.
Book a Demo with Arrivy